I’m going to have to assume, that if you are interested in learning how to photograph the Aurora Borealis (Northern Lights), and that you…
- Have seen the Northern Lights, and
- Expect to see more of them
If you can’t say yes to either of the two, it might be worth your while checking out this article, which can help you predict where and when you can get your chance to see them!
Photographing the Aurora Borealis
Having lived most of my life on the shores of Lake Superior, I’ve been lucky enough to witness this incredible light show more times than I can count. As I grew up and fell in love with the camera, shooting the Northern Lights became a decade-long passion that I’m sure you will come to share! This article will hopefully give you everything you need to get started.

EQUIPMENT NEEDS
Camera:
I hate to break it to you readers… but as much respect as I have for the amazing cameras in smart phones these days, they just can’t get the job done for Northern Lights, or any kind of serious night shooting. You’re going to need a dedicated camera (one that can’t send a text message, or play TikTok videos… a plain old boring camera – but just about any camera will do). Ideally, a digital SLR or even a point-and-shoot camera will work perfectly.
Tripod/sandbag/rice bag:
If you don’t understand why you need a tripod, you will very soon. The fast answer – you need to be able to keep your camera perfectly steady for anywhere from 2-30 seconds. You’ve likely seen blurry shots on your cell phone when shooting in low light. Shooting in the middle of the night only makes this problem worse. Any vibration or movement will cause your shot to be blurry.
The best choice is a tripod. They are adjustable and can hold your camera in place for any composition you want. If you like the idea of shooting Northern Lights, and plan on doing more of it, just go buy one. You’ll never regret it.
If you don’t have a tripod, a bag of sand or rice can do a great job. Put the bag on any surface, pointed at the Northern Lights, and then place your camera on the bag pointing to the Lights. You can angle the camera to compose your shot, then gently press the camera a little deeper to secure it onto the sand/rice bag. It should mold around your camera and keep it in place for the time needed to take the shot.

Cable Release, Digital Remote, or Timer:
Not necessary, but very helpful. Many camera models can use a cable release, digital remote or timer. These basically help keep your camera stable while shooting by reducing vibrations from your hand as you take a picture. Just another tool to help make sure your shots are as sharp as possible. There is nothing worse that blowing that “once in a lifetime” opportunity with a blurry shot.
SETTINGS
Ok… this is the point in the article where I test whether you have had enough sleep last night. I’ll try my best to get just enough information across to help you post dazzling pictures on your Facebook page without putting you to sleep. Here we go. (For anyone completely unfamiliar with your own camera, I suggest you pull out your user manual or run a Google search to find the user manual for your camera online).
To try and keep you awake… I’m going to try and scare some of you. I want you to turn your camera over to the dreaded MANUAL setting!!!! No fancy “Night” or “Auto” settings… Full – take no prisoners – MANUAL!
The reason for manual? Control. Auto settings on cameras are great for almost all daylight and indoor settings, but awful for outdoor nighttime shooting. Don’t worry, it’s easier than you think. The trick to Northern Light shooting is letting in enough light to make a picture (while keeping your camera still enough to not be blurry).
Aperture:
This one is easy. Your camera should have a number on the main display that has an “f/” at the beginning. This is your “F-Stop” or “Aperture”. This number tells you how wide open your camera is to letting light in. Basically, use the lowest number your camera will let you use. Typically, somewhere around the f/2.8, f/4, or f/5.6 setting. Again, the lower the number, the more light your camera is letting in; very important when shooting in low light scenes. (This setting also controls other things but that is not something we are going to worry about today. Look it up if you are interested).
Shutter Speed:
We need to let in enough light to make a picture, and shutter speed will control how long the camera is open. Aperture (discussed above) controls how open your camera is, how much light it is letting in at any given moment. Another way to get enough light to make a picture is to keep your camera open for longer. For daytime shooting, the “shutter” is typically open for only a fraction of a second. Anywhere from 1/8000th (fast, for bright scenes) to ½ second (slow, for darker scenes). For night shooting, you will usually have to use a shutter speed of even longer. I suggest starting at 8 seconds. This will show on most cameras as 8”. If that isn’t bright enough, double that number and shoot again (16 seconds, or 16”). If that’s still too dark, try 30s (30”). One of these speeds should give you bright, vivid colours! Once you’ve figured it out, wait for the lights to change shape or colour and shoot again!
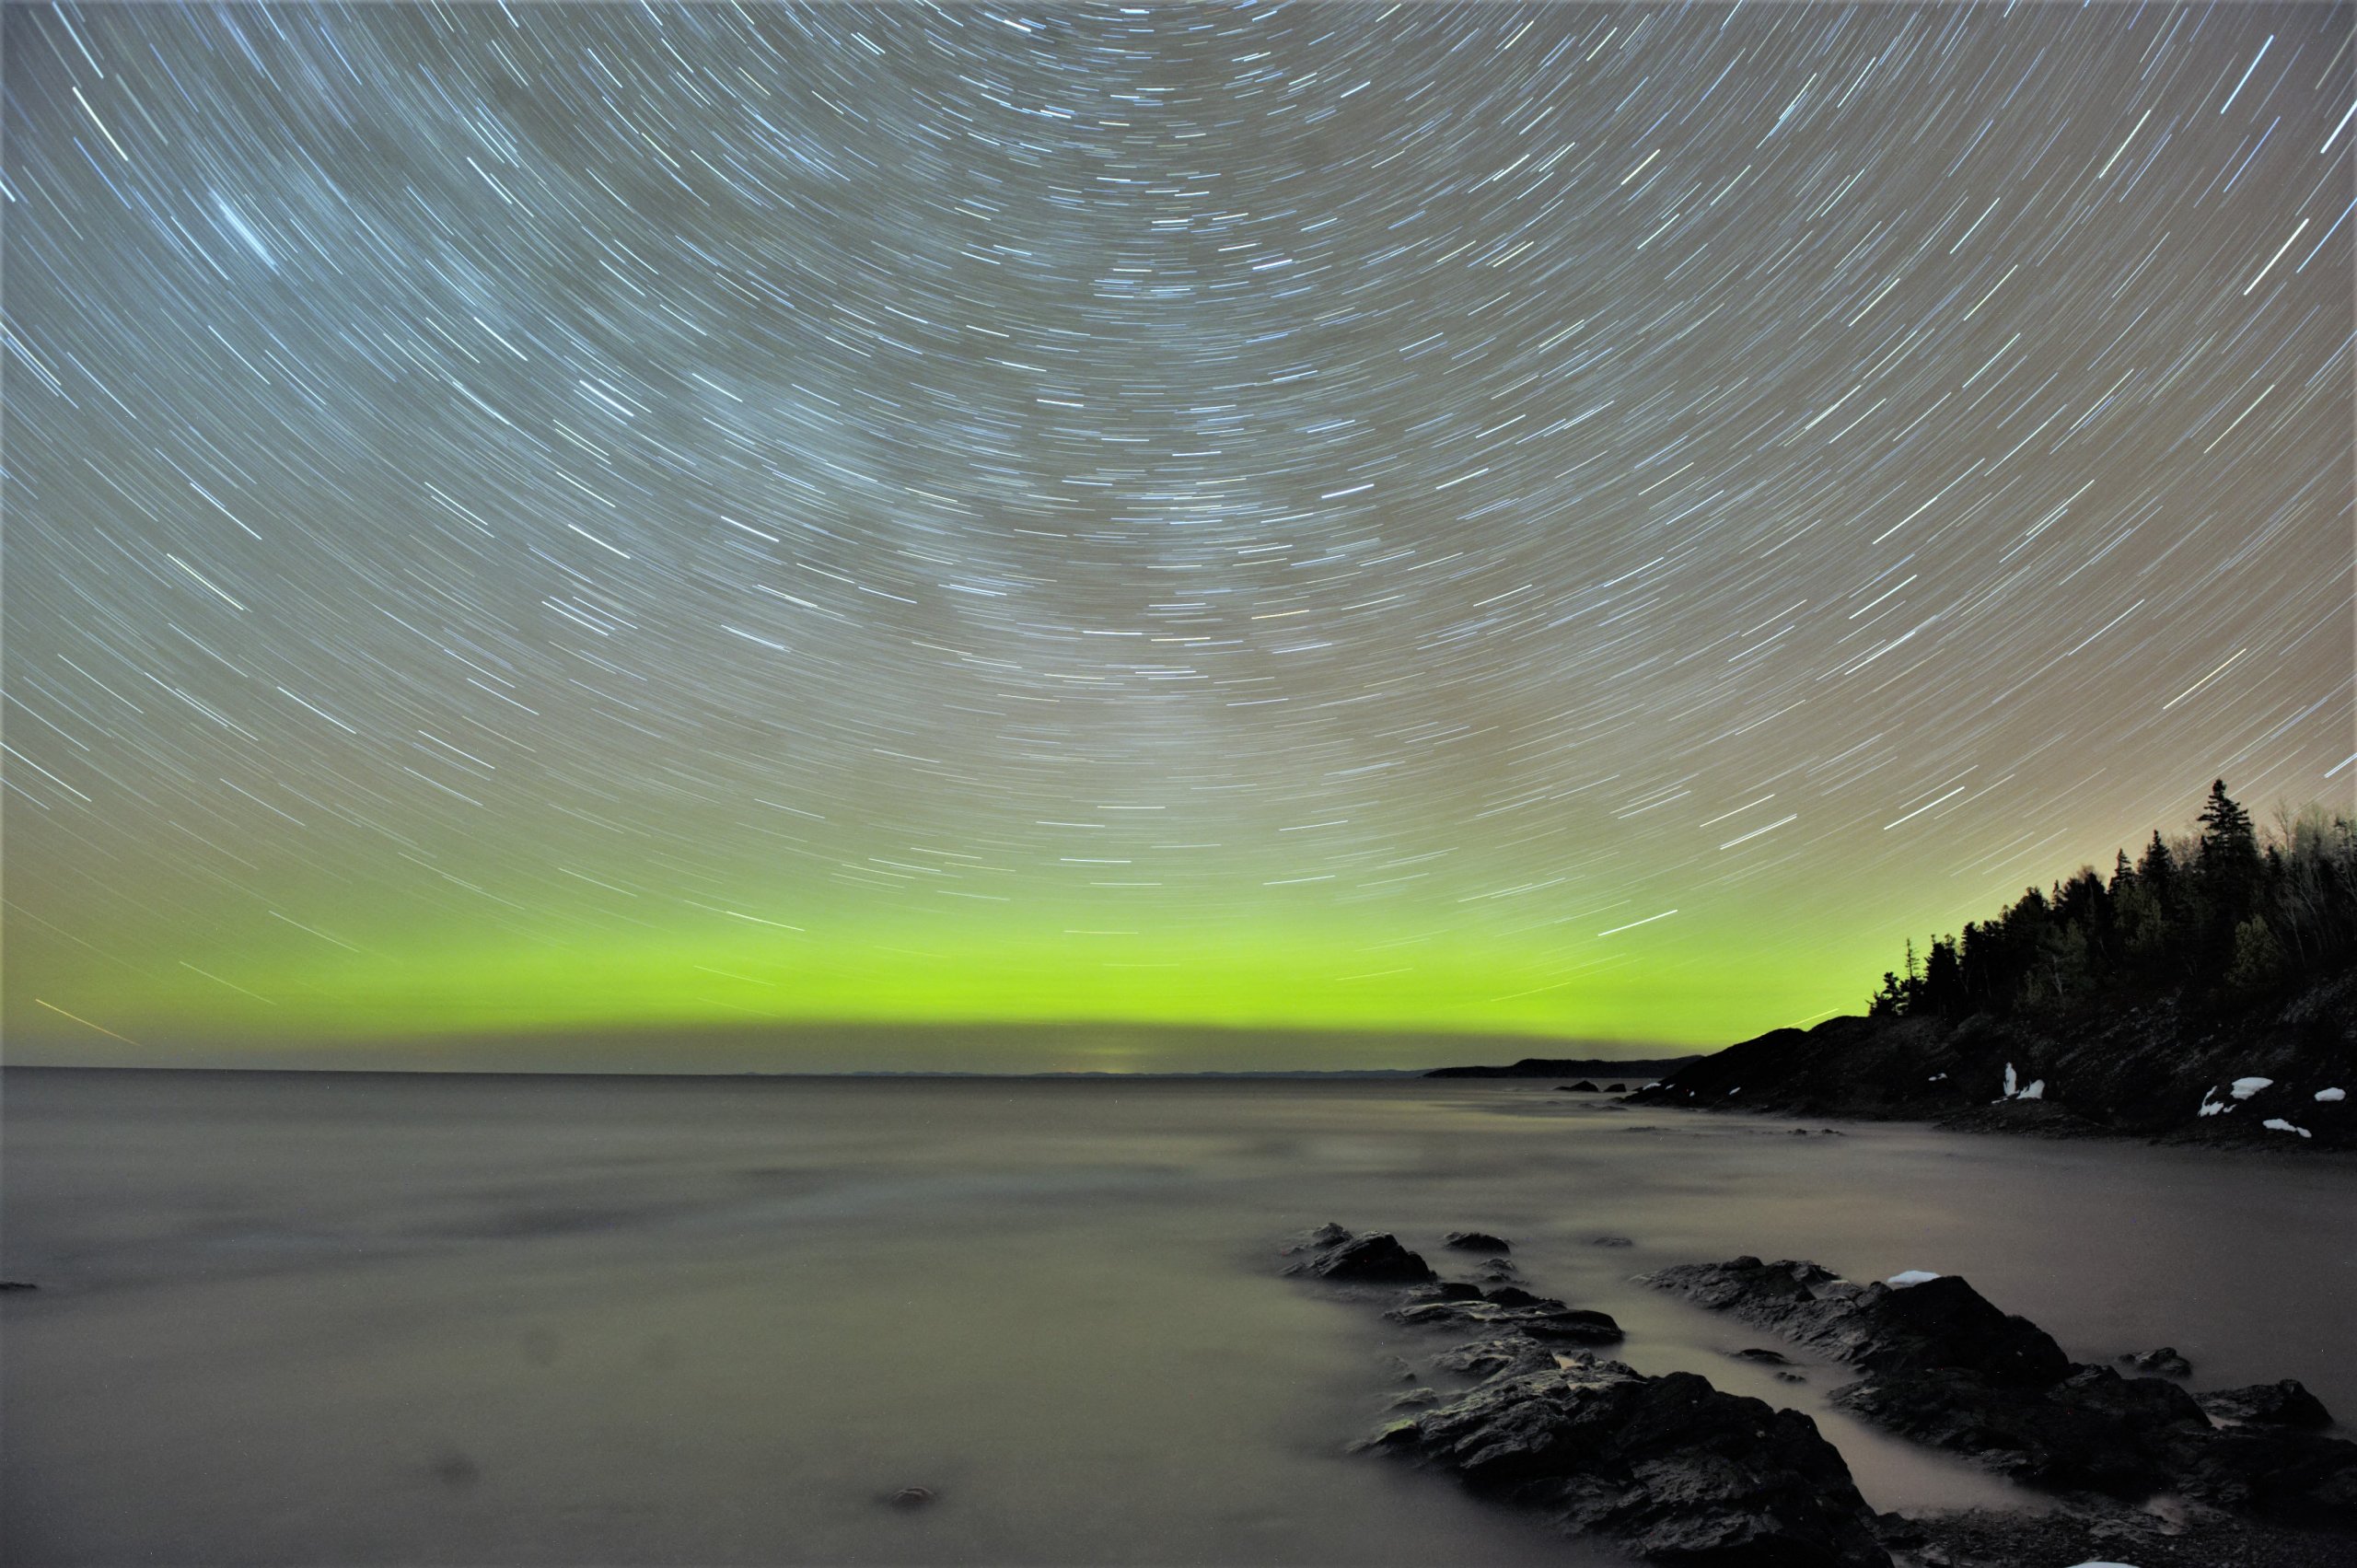
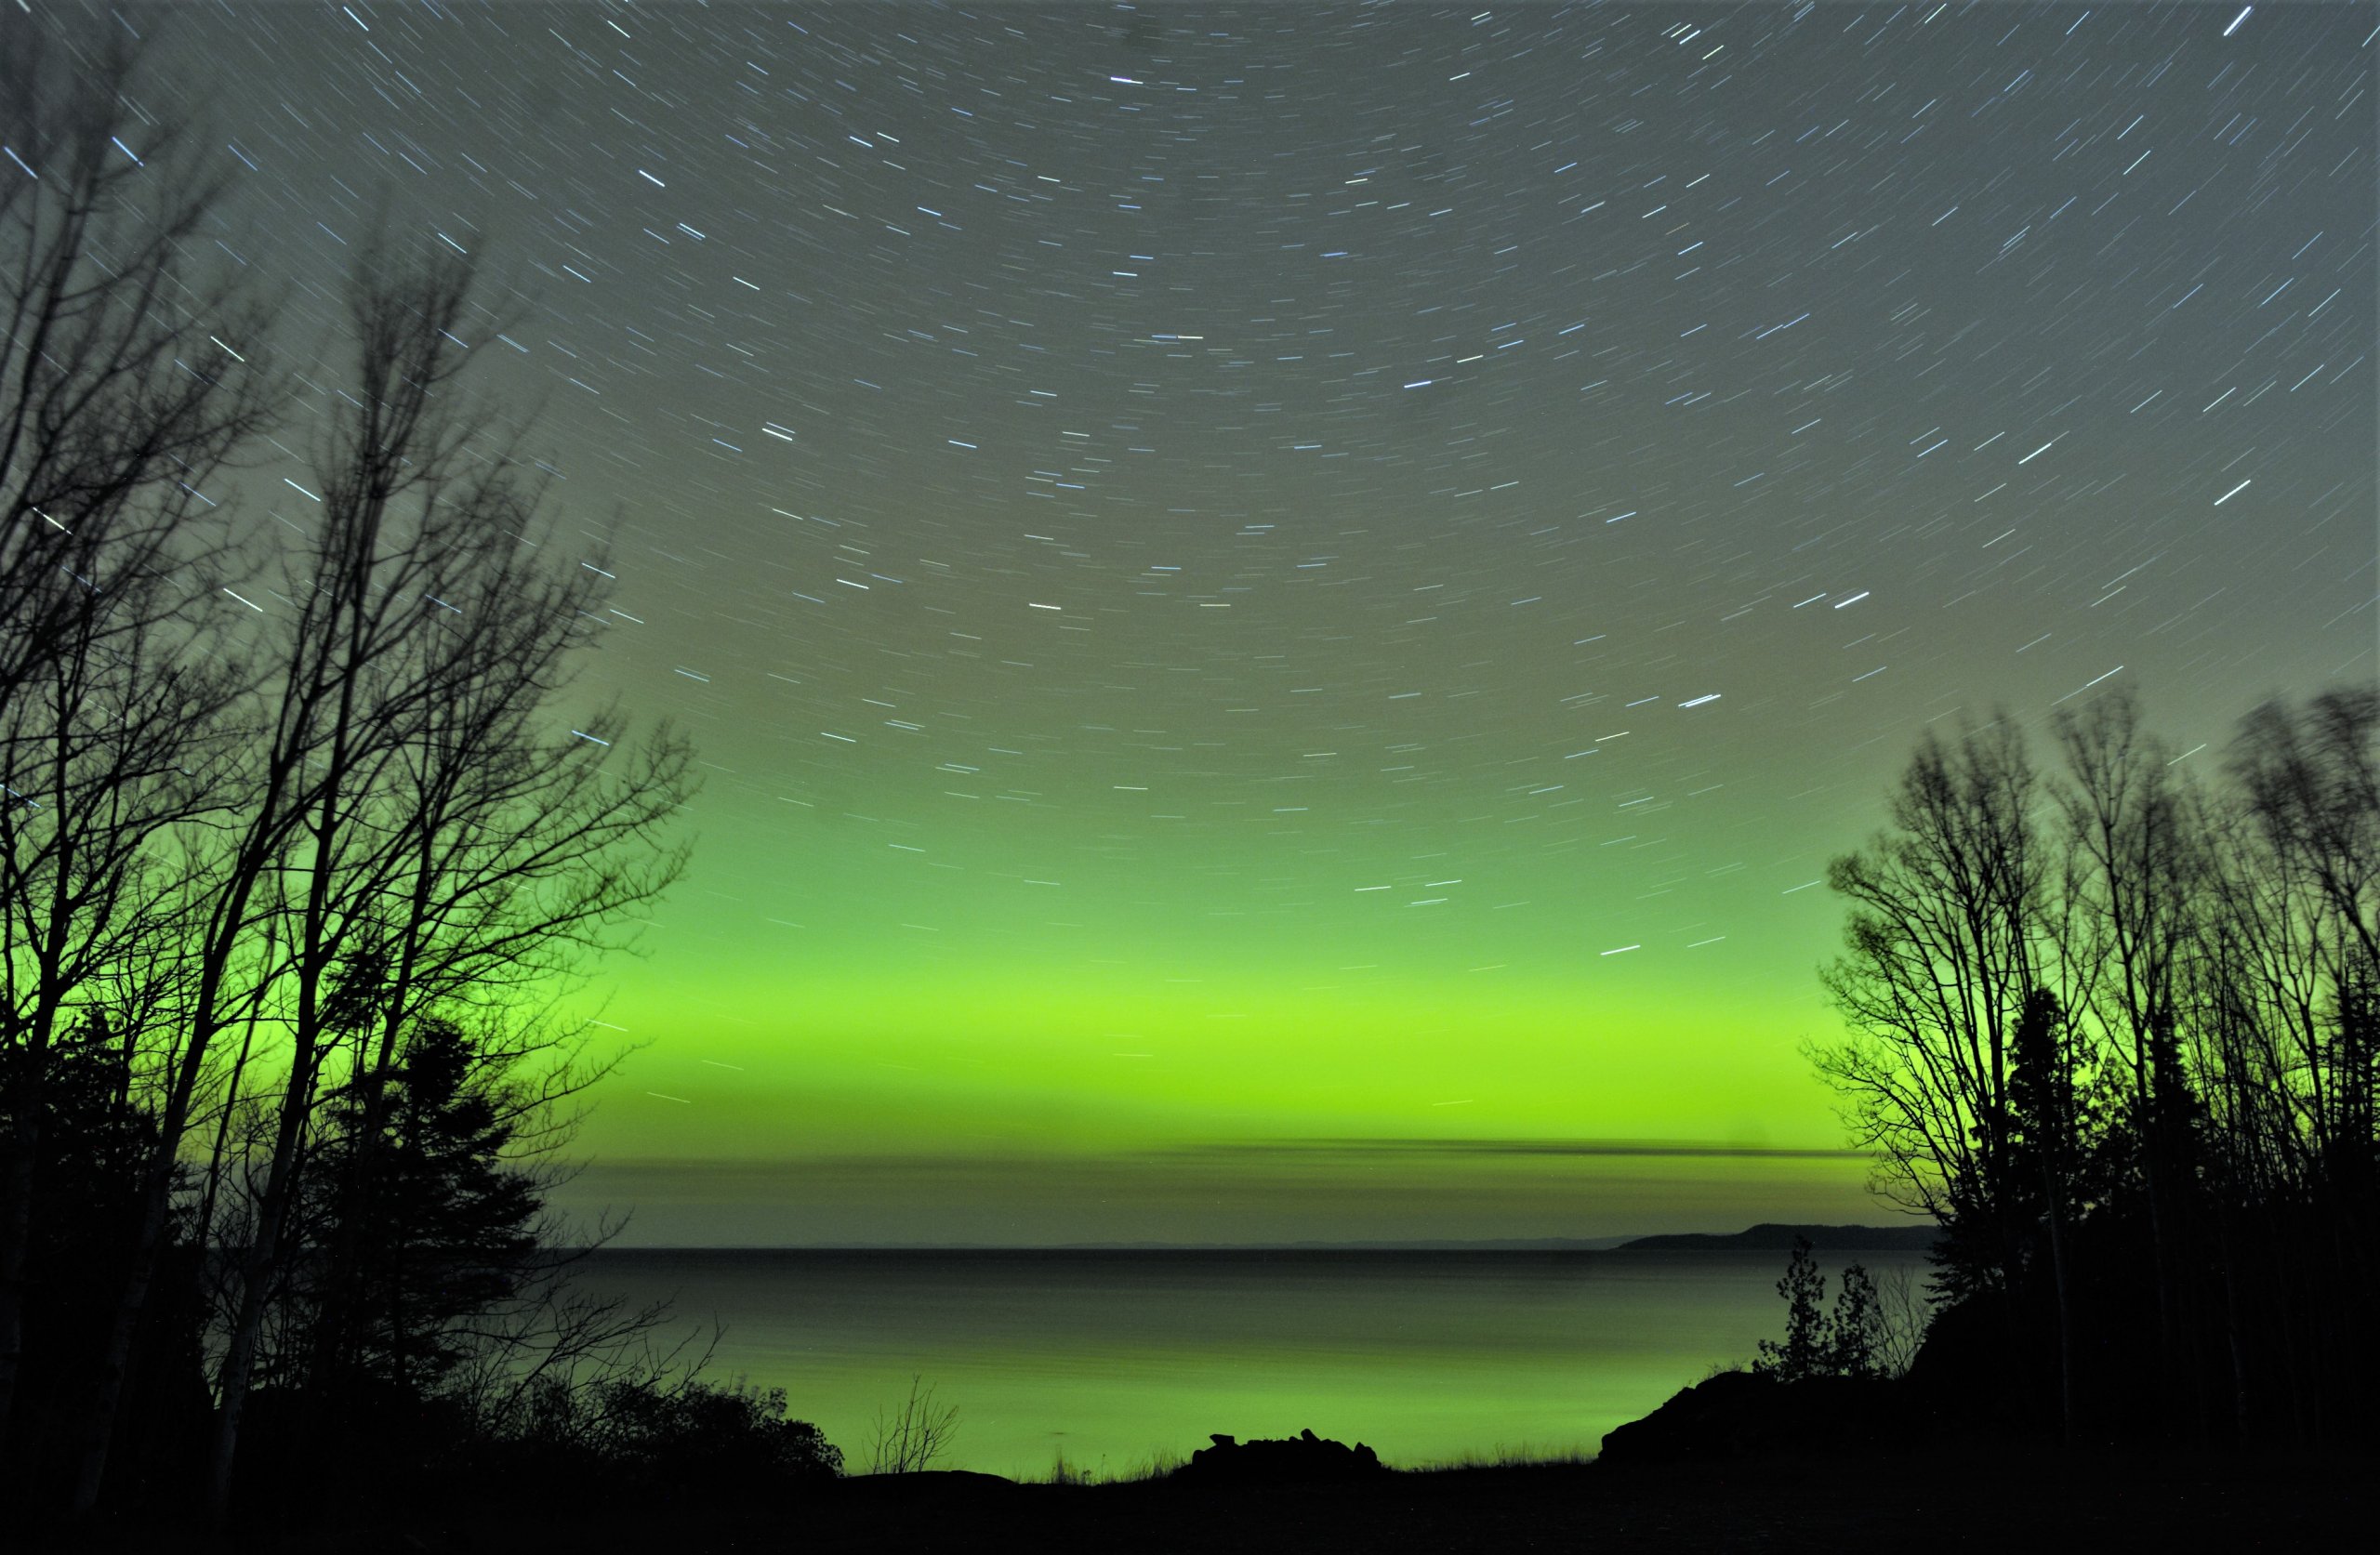
Pictured below, a long +30 second shutter speed. The camera is open for so long that the stars swirl around the North Star as earth rotates, but the camera is open for so long, the Northern Lights are soft and foggy.
In the following shot, a faster shutter speed was used, but the image is much darker because of it.
ISO:
There is one more setting that can make a huge difference to your shot, ISO – the last of the true manual exposure settings. This setting doesn’t change how much light is getting into the camera, it is changing how much light the camera needs to produce an image. The lower the number, the more light needed. ISO usually runs from about 100-128000. ISO 100 is perfect for full sunny days… but would require too much light for Northern Lights. ISO 128000 is very sensitive to light and can make a picture in almost full darkness, but there is a downside.
If you’ve been paying attention, you would need to keep your camera open for a lot longer at ISO 100 than you would at ISO 800 or 1600. So what’s the problem? Well, the higher the ISO number, the image produced will have a lot more grain or “noise” (like a speckle pattern on your shot that lowers the detail).
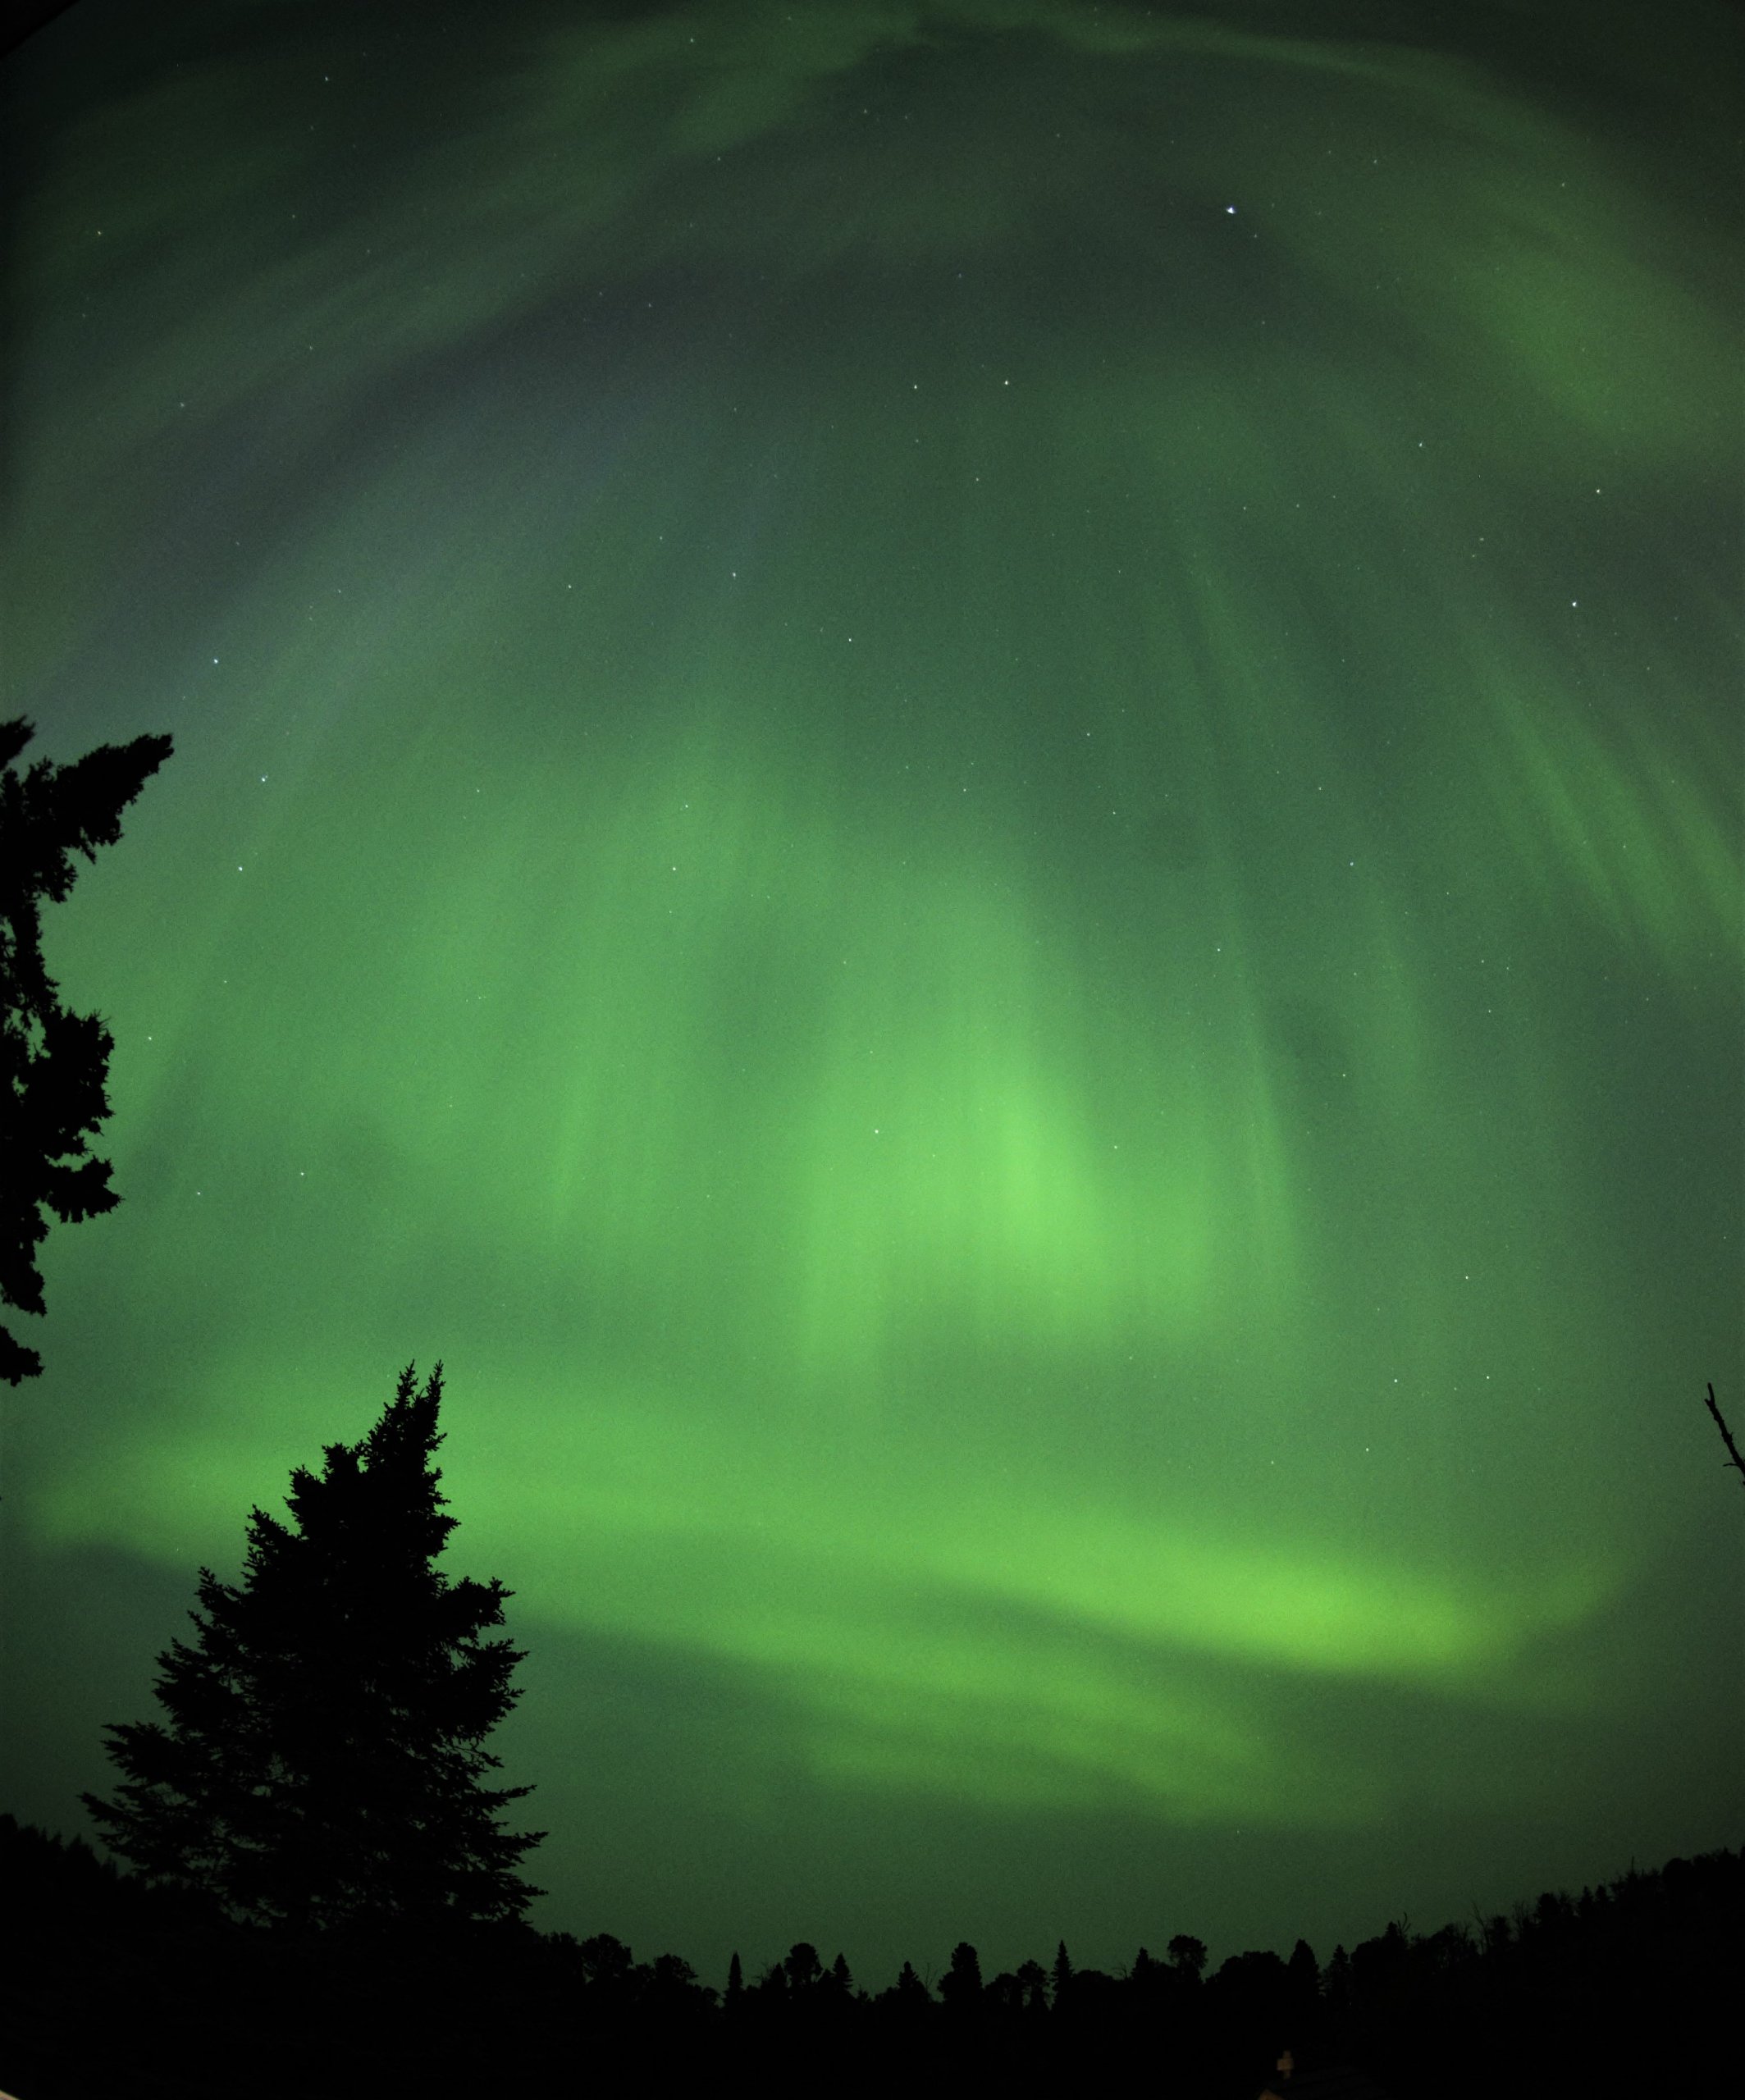
There is a choice to make when shooting Northern Lights that only you can decide. Northern Lights move. We love them for that moving show of glowing light. To shoot a crisp, smooth image, we need to use a lower ISO and keep the camera open for longer, but the lights will show up as an overall glow, with no distinct bands or spikes because of the motion over time. Like this:
Or, we could use a higher ISO and a faster shutter speed to freeze the motion, but then we get that dreaded “noise”. Like this:

The decision about what setting to use is up to you. I typically use something like f/2.8, ISO 400-1600 and whatever shutter speed gives me the proper exposure (8-30 seconds).
Focus:
The last thing to mention… turn your camera to “Manual” focus. Auto focus will struggle to find something to focus on in low light. It will be up to you to set the focus manually.
After you’ve composed your shot and have steadied your camera with a tripod or sand/rice bag, find the farthest thing in your foreground and point a flashlight at it. Turn the dial on your lens to manually focus on that object (tree, shoreline rocks…). Once you’ve focused the camera, turn off all lights and take your first shot.
From here, it’s up to you to play with shutter speed, aperture, and ISO until you find the perfect combination for your scene.
Happy shooting!!!!